博客图片的 WebP 之路在主流浏览器都支持的情况下,我趁着文章还少,把所有文章的图片全部转换为 WebP 格式,以寻求更快的加载速度和丝滑的体验

这篇文章同样有很多不完善的地方,而且由于要写的比较详细的话,可能需要很多截图,而事实上这篇文章不会被太多人看到,所以有需要再进行更新

WebP 转换

个人呢,不喜欢为了这简单的事去下载一个专门的软件,所以必定是找了很久,在搜索引擎和论坛看评论,以及综合个人使用经验,推荐以下平台

  • 没广告,做该做的事
  • 参数可调整

智图

为什么推荐呢,因为对于临时的一张图片用起来还是不错的,而且图片品质参数可调,个人按需以及实际情况做单张图片转换或者优化压缩可使用这个平台

WebP2jpg-online

「无需上传的图片转换器-简单、隐私、快速」官网是这么介绍的啦,纯前端处理,所以速度快慢取决于你的设备性能,适合批量图片处理的情况,同时多参数可调整,处理完毕后会把所有文件打包压缩自动下载,当然支持的格式不仅仅是名字那两种

对于 WebP 动态的处理,个人用多张 gif 试了一下,效果不是很理想,不推荐

如果处理过程中,长时间进度卡着不动,没办法,刷新吧

Gitee Pages(国内访问良好)

GitHub Pages

WebP - 图片格式的发展趋势 - 又拍云

同时缺点吗就是不能快捷方便地选择图片质量(右下角有 api 调用方法,但是改参数真的不方便啊),而且我这边使用只能在控制台Console找报错图片地址,然后新标签页打开保存处理好的WebP动图,也是只支持单张图片处理,所以对于比较小的gif我还是推荐就用gif吧,除非你和我封面一样,几兆一张图必须得压缩,不然博客访问速度可想而知,同时浪费访客的流量

GIF 到 WEBP 转换器

这边测试呢,确实是支持转换的,但得到的图片比原图还大,所以不怎么推荐,但是还支持其他好多种格式转换,所以还是很香的

图床

网上的那些知名图床好是好,但就会偷偷删你文件,所以黑人问号,小众稳定的还是少不过备案了的话白嫖就很简单

流浪图床

5M 以下文件托管,支持了 WebP,api

鸡霸图床

10M 单文件,嗯

鸡霸网盘

30M 以下文件托管,支持了 WebP

IMG.WANG

图床,好吧大家用一个模板套出来的

OneManager

实际上就是利用微软的 OneDrive,如果你也配置了话,不如试试,实际访问速度还是取决于当地运营商,而他提供了游客图床的选项(自己上传了拿到的链接比较好控制,所以就没开),但我没开启(因为我用的云函数),可按照教程配置即可,支持 heroku 一键部署

自动化

方案

我的博客图床仓库README这样写道

  • 本仓库文件使用PicGo上传
  • 其中图片使用gulp imagemin压缩
  • (之后考虑加入WebP转换 👍,gulp作者貌似不考虑适配,虽然imagemin测试成功了,但是还是等等再说)
  • GitHub Actions压缩完成
  • 每天早晚 8 点左右各执行一次压缩
  • 当然也可以手动点击压缩一次
  • 同时游客点击Star也会帮忙压缩一次(谢谢)
  • 图片上传完毕一会儿会由Imgbot压缩提交PR
  • 然后由Restyled进行代码格式重置(图片也不需要了其实)
  • 最后由MergifyGithub Actions自动合并PR(比速度 🚀)
  • (或由我打标签后由PRValet自动完成完成PR合并)

全部换成WebP,不需要自动压缩了,虽然自动压缩是真的方便

但还没完,如果继续使用GitHub做图床,jsDelivrCDN加速,我面临以下问题

  • 将来图片越来越多,仓库体积也会越来越大
  • 涉及到了 jsd 的滥用问题,万一哪天禁了,或者关系到我GitHub账户使用问题,后果很严重
  • 备份在哪,将来统一更换链接方便,有没有满足以下条件的图床
  1. 稳定,这是首要条件
  2. 免费,或者说够我这小型博客免费试用的量
  3. 支持批量上传下载,并且上传后文件名保持不变
  4. 支持API上传,以配合PicGo实现流畅的写作体验
  5. 相册功能要有,批量多种场景不同格式链接以适应不同需求
  6. 友好地支持 WebP 格式(包括动态)
  7. 访问速度还不错 …

当然啦,这么显得我是不是过于贪心了,但真的没有一种比较好的解决方案,对我这种不是优秀博主的人也可以很好的使用免费资源为博客图片加速呢?

A:我也在慢慢摸索中,所以这篇博文会持续更新下去

准备

  1. PicGo 官网因为版本过多原因,这里不放加速下载链接,如果您访问过慢,不如试试加速脚本或者加速插件这里提供我个人搭建的加速站,您可以访问按照教程和说明下载
  2. 关于配置如果要写的话肯定要截图,这里放上别人的文章链接咯,大家自行比对 PicGo+GitHub 快速实现 markdown 图床
  3. 自动压缩
    1. 使用GitHub APP,也就是上面提到的
      • 图片上传完毕一会儿会由Imgbot压缩提交PR
    2. ImgBot optimizes your images and saves you time.
    • 按照要求选择免费计划,授权完毕后勾选需要压缩图片的仓库即可但这就涉及到了是手动合并 PR 还是自动合并 PR 的选择问题,如果你和我一样只要求压缩,实际上当一遍又一遍的压缩优化,推荐大家使用自动合并 PR 解决问题 - 然后由Restyled进行代码格式重置(图片也不需要了其实) - 最后由MergifyGithub Actions自动合并PR(比速度 🚀) - (或由我打标签后由PRValet自动完成完成PR合并)

PNG JPG GIF

如果是选择手动打标签完成合并,即使用PRValet,请前往安装,并按照要求进行配置

How to use PR Valet

  1. Step 1: Install PR Valet.
  2. Step 2: Add the valet:merge label to your pull request.
  3. Step 3: Work on your other tasks while PR Valet takes care of merging your pull request.

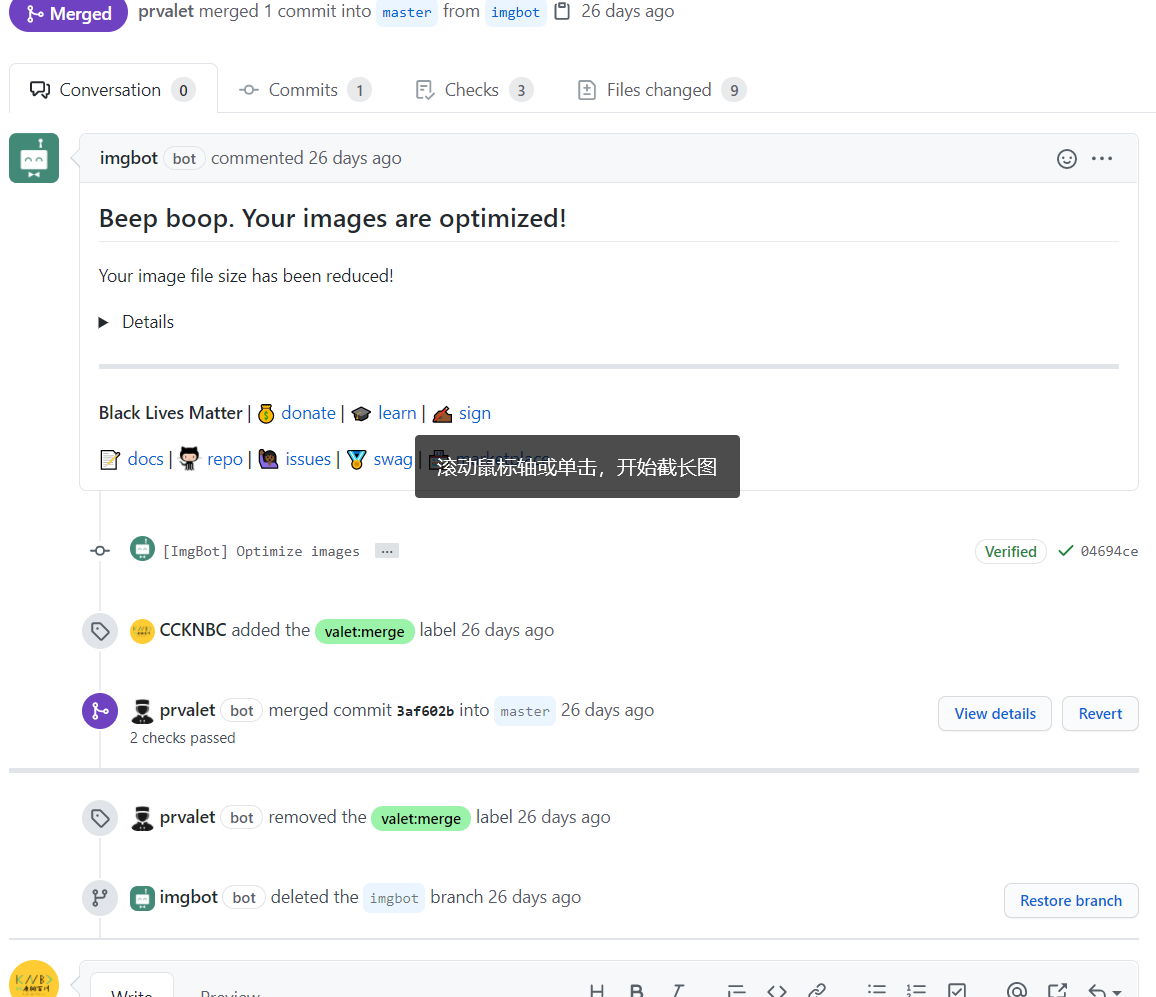
也就是在仓库启用后,去编辑一下 label 标签,添加一个名为valet:merge的标签,而机器人提交了 PR 后,我们打上这个标签,便会自动执行合并操作,之后 imgbot 将删除由imgbot创建的分支 imgbot,方便下次在进行自动压缩,提交 PR

具体过程可通过下图查看(别问我为什么不重新截图)

而我个人在建立博客的几个月中,当然希望啥都能自动化,啥都能免费白嫖,省心最好,因此选择了自动合并

个人推荐使用mergify,因为它算是术业有专攻,老牌子信得过,功能强大,关键是配置也比较简单易懂

教程就不写了(还是写了,往下看),跟着官方文档做就好(谷歌 Chrome 页面翻译?

自动合并配置部分

自动合并配置部分

The Configuration File

Mergify applies rules to your pull requests. To do that, you need to create a Mergify configuration in each repository where Mergify is used.

The configuration file should be created in the root directory of the repository and named either .mergify.yml or .mergify/config.yml or .github/mergify.yml.

As the file name implies, the configuration file format is based on YAML, a simplistic file format for data. The configuration file format is entirely documented in 🔖 Configuration File.

上面官方文档给出了三种创建配置文件的目录,当然我是用第一种(越懒越好)直接根目录创建.mergify.yml文件,文件中的内容如下

mergify 官方给出的例子其中包括了 imgbot,代码如下

1
2
3
4
5
6
7
8
pull_request_rules:
- name: automatic merge for ImgBot pull requests
conditions:
- author=imgbot[bot]
- check-success=Travis CI - Pull Request
actions:
merge:
method: merge

你如果没使用 Travis CI,可以删掉那行,仅满足提交人为 imgbot 这个条件即可即可

刚才的截图告诉我们,自动合并后,imgbot 将自动删除由它创建的imgbot分支,所以这里我们无需额外配置,我只是放在这里看看,假如 imgbot 不会自动删除分支呢

由于此种方式不是通过 fork 创建的 pr,而是通过新建分支,所以必然需要删除无用的分支,别担心,这些都为你想到了,官方文档这么写道

Some users create pull request from the same repository by using different branches — rather than creating a pull request from a fork. That’s fine, but it tends to leave a lot of useless branch behind when the pull request is merged.

Mergify allows to delete those branches once the pull request has been merged:

1
2
3
4
5
6
pull_request_rules:
- name: delete head branch after merge
conditions:
- merged
actions:
delete_head_branch: {}

实际上 Github 提供了自动删除分支选项,你可以去配置里打开它(如果以后在别的项目需要的话

其他更多高级个性化配置可前往官方文档查看,万一以后需要自动合并指定人提交的 PR,还有上面的开启打标签合并选项等操作,再去配置相应的就行了(所以推荐记住这个平台)

关于使用 Actions,如果已经了解并比较熟练的掌握的话推荐使用别人编写好的 actions,你只要 use 即可,配置建议查看自动合并 PR Actions 仓库,详情可以去看 README,但我建议自动合并 PR 的话两种方式选一种即可,不然万一报错邮件是我们不希望看到的而这个 actions 也能实现上面一样的效果,配置MERGE_FILTER_AUTHOR即可: When set, only pull requests raised by this author will be merged automatically.稍微复制粘贴,照着 README 配置即可,actions 教程网上也很多,请自行查看,或者直接查阅官方文档

README 示例代码如下

1
2
3
4
5
6
7
8
9
10
11
12
13
14
15
16
17
18
19
20
21
22
23
24
25
26
27
name: automerge
on:
pull_request:
types:
- labeled
- unlabeled
- synchronize
- opened
- edited
- ready_for_review
- reopened
- unlocked
pull_request_review:
types:
- submitted
check_suite:
types:
- completed
status: {}
jobs:
automerge:
runs-on: ubuntu-latest
steps:
- name: automerge
uses: "pascalgn/automerge-action@v0.12.0"
env:
GITHUB_TOKEN: "${{ secrets.GITHUB_TOKEN }}"

关于这个GITHUB_TOKEN,在前文中配置 Picgo 提到过,用一样的即可,我们在项目仓库中添加 secrets 即可,当然按照官方文档配置的话,这个名字得叫GITHUB_TOKEN

在 workflow 文档流里我们可以用${{ secrets.GITHUB_TOKEN }}做权限认证,是一个默认存在的变量,并不需要我们去添加 ACCESS_TOKEN,不过要是跨仓库还是要使用手动生成的 TOKEN,关于这点,可以查看官方文档相关内容

要实现自动合并 imgbot 提交的 PR,我的 workflow 这么配置

使用GitHub Actions,每天定时压缩

这有个好处就是由于是本仓库文件,所以省去了Secrects配置,直接 push 就行,也比较省心,同时图片压缩质量是通过调整参数可控的,当然也可以再每次博客写完,图片上传完毕后手动压缩一次,达到可控效果,毕竟我们并不希望上传一张照片自动压缩一次,浪费资源哦

自动压缩配置部分

自动压缩配置部分

我的 workflow 这么配置的

1
2
3
4
5
6
7
8
9
10
11
12
13
14
15
16
17
18
19
20
21
22
23
24
25
26
27
28
29
30
31
32
33
34
35
36
37
38
39
40
41
42
43
44
45
46
47
48
49
50
51
52
53
54
name: Compress Image

on:
schedule:
- cron: "0 0,12 * * *"
workflow_dispatch:
inputs:
name:
description: "自己手动压缩一次"
required: false
watch:
types: [started] #游客帮忙手动压缩一次,不用判断

jobs:
deploy:
runs-on: ubuntu-latest

steps:
- name: Checkout
uses: actions/checkout@v2
with:
ref: master

- name: Setup Node
uses: actions/setup-node@v2-beta
with:
node-version: "12.x"

- name: Catch
uses: actions/cache@v2
id: cache-dependencies
with:
path: node_modules
key: ${{runner.OS}}-${{hashFiles('**/package-lock.json')}}

- name: Install Dependencies
if: steps.cache-dependencies.outputs.cache-hit != 'true'
run: |
npm install

- name: Compress
run: |
gulp

- name: Deploy
run: |
git config --global user.name "github-actions[bot]"
git config --global user.email "github-actions[bot]@users.noreply.github.com"
git init
git add -A
git commit -m "$(date +"%Z %Y-%m-%d %A %H:%M:%S") Updated By Github Actions"
git push

# 当然啦也可以部署到别的分支,或者使用别人编写好的脚本来完成部署,同时也可以设置一下环境变量时区改为上海

但你们需要替换一下这部分内容(因为没有package.json

1
2
3
4
5
    - name: Install Dependencies
if: steps.cache-dependencies.outputs.cache-hit != 'true'
run: |
npm install gulp gulp-imagemin
//安装依赖,插件,使用gulp帮忙完成压缩

同时根目录需要有gulpfile.js,来完成配置

1
2
3
4
5
6
7
8
9
10
11
12
13
14
15
16
17
18
19
20
var gulp = require("gulp");
var imagemin = require("gulp-imagemin");

// 壓縮 public/uploads 目錄內圖片
gulp.task("minify-images", async () => {
gulp
.src(".public/uploads/**/*.*")
.pipe(
imagemin({
optimizationLevel: 7, // 類型:Number 預設:3 取值範圍:0-7(優化等級)
progressive: true, // 類型:Boolean 預設:false 無失真壓縮jpg圖片
interlaced: true, // 類型:Boolean 預設:false 隔行掃描gif進行渲染
multipass: true, // 類型:Boolean 預設:false 多次優化svg直到完全優化
})
)
.pipe(gulp.dest("./blog")); //输出到blog文件夹
});

// 執行 gulp 命令時執行的任務
gulp.task("default", gulp.parallel("minify-images"));

这种老的配置方法主要是任务执行时间比较短,反正也是白嫖,执行个一个小时也不为过?

那你可以替换为新版配置

1
2
3
4
5
6
7
8
9
10
11
12
13
14
15
16
17
18
19
20
21
22
23
24
25
26
27
28
29
30
31
32
33
34
35
36
37
38
39
40
41
42
43
44
45
46
47
48
49
50
const gulp = require('gulp'); // 基础库
const imagemin = require('gulp-imagemin'); // 图片压缩
// pngquant = require('imagemin-pngquant'); // 深度压缩

exports.default = () => (
gulp.src('src/images/*')
.pipe(imagemin())
.pipe(gulp.dest('dist/images'))
);

// …
.pipe(imagemin([
imagemin.gifsicle({interlaced: true}),
imagemin.mozjpeg({quality: 75, progressive: true}),
imagemin.optipng({optimizationLevel: 5}),
imagemin.svgo({
plugins: [
{removeViewBox: true}, // 移除svg的viewbox属性
{cleanupIDs: false}
]
})
]))
// …

// …
.pipe(imagemin({
interlaced: true,
progressive: true,
optimizationLevel: 5,
svgoPlugins: [
{
removeViewBox: true
}
]
}))
// …

// …
.pipe(imagemin([
imagemin.svgo({
plugins: [
{
removeViewBox: true
}
]
})
], {
verbose: true
}))
// …

请不要无脑复制,自行整合,开启关闭需要的,按照官方配置即可

自动转换配置部分

自动转换配置部分

和自动压缩差不多,但我们说了,那是之前的解决方案,现在我们是要让博客使用 WebP,因此必须要向前看,自动转换为 WebP,同时 jsd 链接后缀也得自动改或者手动改,这我还在研究中

  • 其中图片使用gulp imagemin压缩
  • (之后考虑加入WebP转换 👍,gulp作者貌似不考虑适配,虽然imagemin测试成功了,但是还是等等再说)为什么这么说,已经配置了gulpfile.js,我不想再配置imagemin.js,少一个文件是一个文件

还是用到了 gulp,所以 gulp还是要装

配置差不多,用到的插件是

1
npm install --save-dev gulp gulp-WebP

gulpfile.js配置如下

1
2
3
4
5
const gulp = require("gulp");
const WebP = require("gulp-WebP");

exports.default = () =>
gulp.src("src/image.jpg").pipe(WebP()).pipe(gulp.dest("dist"));

至于怎么编写 actions 工作流文件,你应该会了

不过还是不能不考虑 imagemin 自己的插件,那是真好用

具体可查看官方

https://github.com/imagemin/imagemin

https://github.com/imagemin/imagemin-gif2WebP

如果是压缩 jpg,png,安装插件

1
npm install imagemin imagemin-jpegtran imagemin-pngquant

配置文件写在imagemin.js文件里面,说真的不错啊,命令是node imagemin.js

1
2
3
4
5
6
7
8
9
10
11
12
13
14
15
16
17
18
const imagemin = require("imagemin");
const imageminJpegtran = require("imagemin-jpegtran");
const imageminPngquant = require("imagemin-pngquant");

(async () => {
const files = await imagemin(["images/*.{jpg,png}"], {
destination: "build/images",
plugins: [
imageminJpegtran(),
imageminPngquant({
quality: [0.6, 0.8],
}),
],
});

console.log(files);
//=> [{data: <Buffer 89 50 4e …>, destinationPath: 'build/images/foo.jpg'}, …]
})();

但我们显然要转成 WebP,

1
npm install imagemin imagemin-WebP

具体配置如下,效果比较好

1
2
3
4
5
6
7
8
9
10
11
12
13
14
15
16
17
18
19
20
21
22
const imageminWebP = require("imagemin-WebP");
const convertPNGToWebP = () =>
imagemin([PNGImages], output, {
use: [
imageminWebP({
quality: 85,
}),
],
});
const convertJPGToWebP = () =>
imagemin([JPGImages], output, {
use: [
imageminWebP({
quality: 75,
}),
],
});
optimiseJPEGImages()
.then(() => optimisePNGImages())
.then(() => convertPNGToWebP())
.then(() => convertJPGToWebP())
.catch((error) => console.log(error));

官方的话,给了一个区间

1
2
3
4
5
6
7
8
9
10
11
const imagemin = require("imagemin");
const imageminWebP = require("imagemin-WebP");

(async () => {
await imagemin(["images/*.{jpg,png,WebP}"], {
destination: "images",
plugins: [imageminWebP({ quality: 80 })],
});

console.log("Images optimized");
})();

下面是 gif 转 WebP,我还没本地测试,不知道是否是能转成和 gif 差不多的动图而不是静态 WebP

1
npm install --save imagemin imagemin-gif2WebP
1
2
3
4
5
6
7
8
9
10
11
const imagemin = require("imagemin");
const imageminGif2WebP = require("imagemin-gif2WebP");

(async () => {
await imagemin(["images/*.gif"], {
destination: "build/images",
plugins: [imageminGif2WebP({ quality: 50 })],
});

console.log("Images optimized");
})();

或者也可以去官方仓库看看别的插件,配置用法,反正我觉得 imagemin 本身还是挺好用的(相比于 gulp)

这里是一个早期的例子,现在有些已经过时

1
npm i imagemin imagemin-giflossy imagemin-mozjpeg imagemin-pngquant imagemin-svgo imagemin-WebP
1
2
3
4
5
6
7
8
9
10
11
12
13
14
15
16
17
18
19
20
21
22
23
24
25
26
27
28
29
30
31
32
33
34
35
36
37
38
39
40
41
42
43
44
45
46
47
48
49
50
51
52
53
54
55
56
57
58
59
60
61
62
63
64
65
66
67
68
69
70
71
72
73
74
75
76
77
78
79
80
81
82
83
84
85
86
87
88
89
90
91
92
93
94
95
96
97
98
99
100
101
102
103
104
105
106
107
108
109
110
111
112
113
114
115
116
117
118
119
120
121
122
123
124
125
126
127
128
129
130
131
132
133
134
135
136
137
138
139
140
// 安装依赖:npm i imagemin imagemin-giflossy imagemin-mozjpeg imagemin-pngquant imagemin-svgo imagemin-WebP

const fs = require("fs");
const path = require("path");
const imagemin = require("imagemin");
const imageminMozjpeg = require("imagemin-mozjpeg");
const imageminPngquant = require("imagemin-pngquant");
const imageminGiflossy = require("imagemin-giflossy");
const imageminWebP = require("imagemin-WebP");
const imageminSvgo = require("imagemin-svgo");

//stream pipeline
const util = require("util");
const stream = require("stream");

const imgMIMEList = {
svg: "image/svg+xml",
png: "image/png",
jpg: "image/jpeg",
jpeg: "image/jpeg",
gif: "image/gif",
bmp: "image/bmp",
WebP: "image/WebP",
ico: "image/x-icon",
tif: "image/tiff",
psd: "application/octet-stream",
};

//TODO:提示压缩率

const fn_imagemin = async (ctx, next) => {
const file = ctx.request.files.file; // 获取上传文件
const reader = fs.createReadStream(file.path); // 创建可读流
const ext = file.name.split(".").pop(); // 获取上传文件扩展名
const dataMIME = "data:" + imgMIMEList[ext] + ";base64,"; //根据扩展名设定媒体类型

const imgName = getRandomId() + "." + ext; //压缩图片文件名
const imgSourcePath = `storage/upload/img`; //压缩源图片文件夹
const imgResultPath = `storage/result/img`; //压缩目标文件夹

const imgSourcePathFile = `${imgSourcePath}/${imgName}`; //压缩源图片路径
const imgSourcePathFileCWD = path.resolve(process.cwd(), imgSourcePathFile); //压缩源图片绝对路径

const imgSourcePathCWD = path.resolve(process.cwd(), imgSourcePath); //源文件夹绝对路径
const imgResultPathCWD = path.resolve(process.cwd(), imgResultPath); //目标文件夹绝对路径

const upStream = fs.createWriteStream(imgSourcePathFileCWD); // 创建可写流 存储源图片
// reader.pipe(upStream);// 可读流通过管道写入可写流
const pipeline = util.promisify(stream.pipeline);
let resultData = null;
await pipeline(reader, upStream);
await imageCompress(imgSourcePathFile, imgResultPath, (imgBuffer) => {
resultData = dataMIME + imgBuffer.toString("base64");
}).catch((err) => {
ctx.response.status = 201;
});

//删除图片
setTimeout(() => {
deleteFile(imgSourcePathCWD, imgName);
deleteFile(imgResultPathCWD, imgName);
}, 0);

if (file) {
ctx.response.body = resultData;
} else {
ctx.response.status = 204;
}
};

/**
* 压缩图片
* @param {String} sourcePath
* @param {String} resultPath
* @param {Function} callback
*/
async function imageCompress(sourcePath, resultPath, callback) {
const files = await imagemin([sourcePath], {
destination: resultPath,
plugins: [
imageminMozjpeg({
quality: 70,
}),
imageminPngquant(),
imageminGiflossy({
lossy: 80,
}),
imageminWebP(),
imageminSvgo(),
],
});

const imgBuffer = files[0].data;
callback(imgBuffer);
}

/**
* 获取随机id
*/
function getRandomId() {
return Math.random().toString(36).substr(2) + Date.now().toString(36);
}

/**
* 删除某一个包下面的需要符合格式的文件。
* @param {String} url 文件路径,绝对路径
* @param {String} name 需要删除的文件名称
* @return {Null}
* @author huangh 20170123
*/
function deleteFile(url, name) {
let files = [];

if (fs.existsSync(url)) {
//判断给定的路径是否存在

files = fs.readdirSync(url); //返回文件和子目录的数组

files.forEach(function (file, index) {
let curPath = path.join(url, file);

if (fs.statSync(curPath).isDirectory()) {
//同步读取文件夹文件,如果是文件夹,则函数回调
deleteFile(curPath, name);
} else {
if (file.indexOf(name) > -1) {
//是指定文件,则删除
fs.unlinkSync(curPath);
console.log("删除文件:" + curPath);
}
}
});
} else {
console.log("给定的路径不存在!");
}
}

module.exports = {
"POST /upload/img": fn_imagemin,
};

我们原来还在顾忌 WebP 的支持问题,考虑自适应,加入判断,又拍云,https://WebP.sh/ 也提供这样的功能,但现在我的态度是,你看不到我博客的图片是你我无缘

视频(题外话)

鸡霸网盘 2 号

视频文件小于 300M,免审核

预览

Teambition

当阿里这个免费的办公协同工具诞生,我们在上传大文件视频进入播放页拿到 API 调用地址即可,不限速,临时使用(几天后地址会失效,或许有大神,蹲 API)

OneManager

实际上就是利用微软的OneDrive,如果你也配置了话,不如试试,实际访问速度还是取决于当地运营商

预览

关联阅读

Gulp 中文文档

Web 性能优化: 图片优化让网站大小减少 62%

CDN 解决方案

拿又拍云来说,图像处理,URL 作图 是个不错的解决方案